As an avid enthusiast of HMB or Historical Medieval Battle I have always wanted to get involved and get well and truly stuck in to a good armoured fight. The only problem is I need suitable armour capable of withstanding some serious impact and capable of distributing such force through it rather than me.
As a starting point I recently attend the Heritage Cup to get an idea of what kind of armour is most common. This is where I saw the coat of plates first hand and up front. Made from a durable wool, linen or canvas material, the coat has metal plates riveted into it to form a modular and flexible piece of body armour. Think the bullet proof vests of the middle ages.
Having seen what one was I decided this was going to be the first part to acquire and by acquire I mean make myself. Below I have broken it down into small sections with an overview of what went into each bit.
Selecting the material
You have two bug choices to make, what type of steel to use and also what type of fabric to use for the garment. For the steel I chose what was the minimum recommendation in the HMB and IMCF rules for torso protection, 1mm thick mild steel. For the garment I went with a linen inner liner sticthed to an outer heavy felted wool.
Selecting the pattern
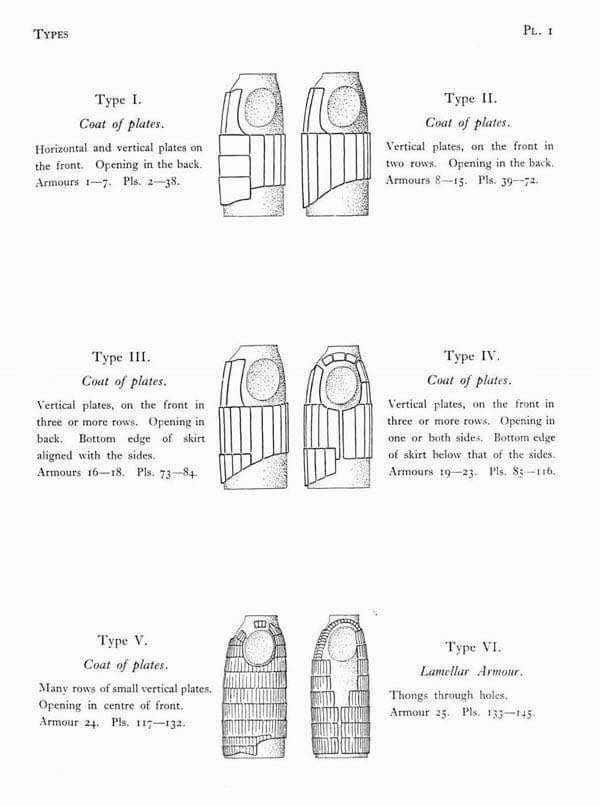
As a coat of plates or an armour used in HMB has to be historically accurate, you need to ensure you are working to an accurate pattern. I decided to opt for a Wisby Type 1 as per the photo.
Cutting the metal and drilling
Next is to cut the metal plates that will form the pattern. This is somewhat subjective based on your own body composition. I ended up using 18 plates in total which I modelled using AutoCAD before having them plasma cut to ensure accuracy. The next step was to ensure the holes were drilled for the rivets. I went for a 5mm hole to accept a 4.5mm shank rivet.
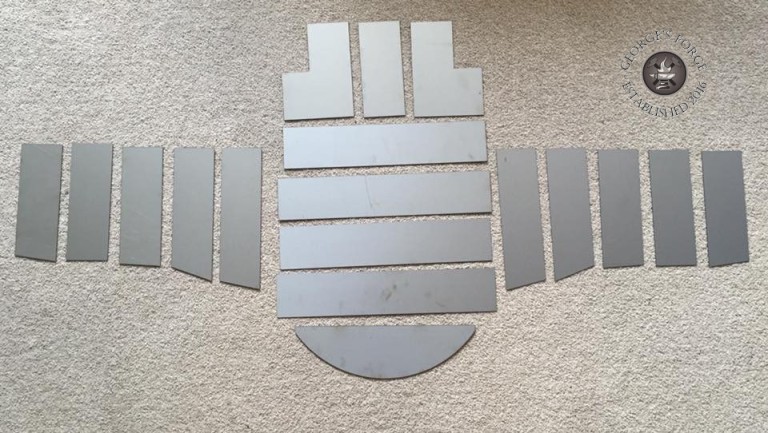
Plate forming
As the plates needed to follow the contours of my body, I next needed to form them to shape. This is easier said than done. In order to roll the chest and front torso protection I used a form which I made out of an old helium gas canister. Using this and a rubber mallet I formed the plates into a curvature which felt comfortable against the body. The kidney/side plates were formed using a vice and a wooden mallet, bending them along their centre line and then rolling them inwards slightly.


Making the coat
Now it is onto the coat itself as we have the plates but we need something to affix it too. As this garment needs to be very hard wearing, I decided to go with a mix. This consisted of a tough linen inner liner stitched to a heavy felted wool outer. The main thing to remember with this is that the coat of plates is designed to be worn OVER an arming jacket and chain mail. As such you need to allow sufficient room in your measurements to accommodate the extra thickness underneath.


Stitching the layers
Herein lies the very difficult bit. As this material is very, very thick, a normal sewing machine is not powerful enough to stitch this garment. As such this was sewn by my lovely wife in 3 hours BY HAND!!! The result is a beautiful and hard wearing garment that is worthy of accepting the plates.
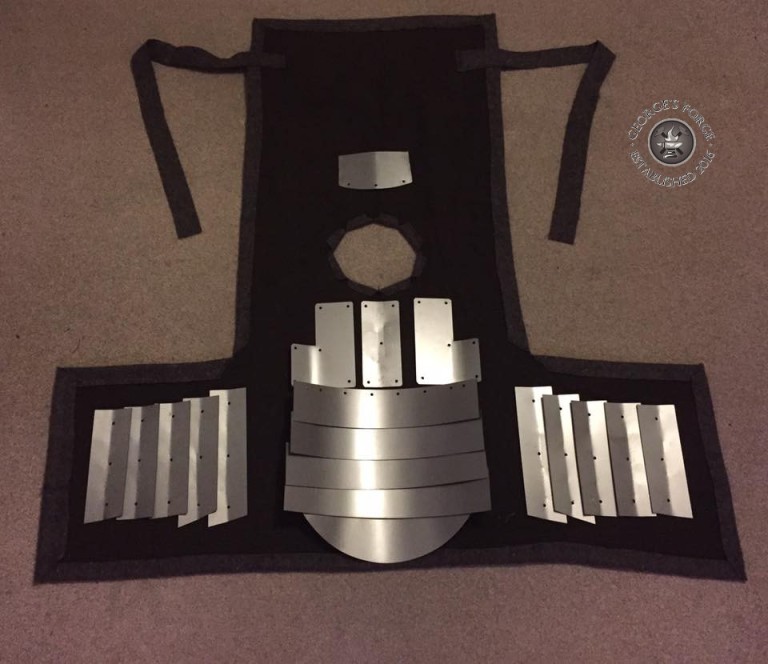
Laying out the plates with the garment
Before the hard work really starts it’s best to lay out your plates and the garments to ensure you get the correct fit. This is the ideal time to check the overlaps and ensure maximum coverage throughout. Once you are happy it’s time to progress to the riveting stage.
Rivets, rivets everywhere but I was this job was easier!
Now here comes the hardest part riveting the plates to the garment. There are two schools of thought on this, the easy way and the authentic way. As this was my first ever coat of plates, authentic was the way to go albeit at my own peril. I decided to hand rivet every plate, but as I was going for authentic, I decided I was going to hand cut and hand fix all the rivets. To do this, I got hold of a stock of 4.5mm diameter x 100mm long nails. Each one was then cut down so it had a rivet shank length of 5mm, enough to pass through the garment, through the plate and then be peened over to hold securely. After many hours of hammering and sore fingers, all the plates were affixed and the garment was solid!


Final touches
Finally onto the final touches. You need to decide how you will close the coat, whether that be at the back, side or front. I chose two independent methods, The rear panel has tie tabs of heavy felted wool which I tie around my chest to keep the back in place, the rear is fastened and affixed using 2 leather straps and buckles with a central leather lace.
The finished article
Here is the finished article! A total of 50 hours of work which was aided by the AutoCAD and Plasma cutting of the plates. This could however be anything up to 100 hours!
Next on the list is a helmet suitable to take the big hits of HMB!
